For the full report on this amazing one-day campaign organized by Nikolas Lloyd see the summary. The effects of earlier games were already being seen by the time we started playing and the sense of being involved in something bigger than our game room gave additional spice to the play.
We played this game on the morning of April 4, 2009. I had a late start setting up the table (due in part to someone using a baseball bat on my mailbox the night before), but we started at about 10:30 AM and played until almost 1:30 PM.
| Allied Forces | German Forces |
|---|---|
Two Companies (regular)

 1st Coy:
  1 CC (+1*)
  1 HMG
  1 FOO for medium artillery, 10 HE, 8 Smoke FMs
  3 Platoons each with:
    1 PC (+1*), 3 Rifle, 1 with Bazooka

 2nd Coy same except:
  1 CC (+0)
  1 FOO for 81mm mortar and 12 FMs

1 M4 Sherman
1 M4A1(76) Sherman

* Rallying only
|
Two Companies (regular) 1st Coy: 1 CC (+1) 2 HMG 1 FOO for 81mm mortar 10FMs 1 Panzerschreck team PC (+2), 3 rifle sections, third has early panzerfaust PC (+1), 3 rifle sections, third has early panzerfaust PC (+1), 3 rifle sections, third has early panzerfaust 2nd Coy: 1 CC (+0) 1 HMG 1 FOO for 81mm mortar 8FMs PC (+2), 3 rifle sections, third has early panzerfaust PC (+1), 2 rifle sections, second has early panzerfaust PC (+0), 2 rifle sections. 1 Stug IV 1 88mm Flak 1 SdKfz 7/2 (to tow Flak) |
ObjectivesPress ahead and attack towards the town. Kill Germans. DeploymentDeployment If you are lucky, you may be able to enter not only from the western edge of the table, but also from the western half of the north side. This depends on whether two pillboxes in Game 9 have been destroyed, that were dominating the road to the north. You will be told on the day. This fact is secret from the German player, so he may get a nasty surprise. |
ObjectivesHold the line! Throw back the enemy. Defend the town. Preserve forces. The town contains many Third Reich officials, settlers, and Vichy collaborators, as well as factories, and depots. DeploymentIf you are very lucky, the allied advance will be slow enough for some of your men to have arrived, dug in, and camouflaged their positions (hidden deployment) however it is more likely that they will deploy as normal. You will be told on the day. You deploy anywhere on the table except within a foot of the allied starting (western) edge. The 88mm Flak gun must be deployed within the eastern quarter of the table. It is a valuable asset, and can be towed by the Skfz7/2. |
Special Rules
- Vehicles: unlimited movement but could only fire their main gun once per initiative. Unlimited MG fire was possible in lieu of firing the main gun. Creating a fire-group between the MGs and the main gun was not allowed.
- Clock: The game starts at 1430 GT. At the end of every German initiative, roll 1d6 and add 5 minutes to clock on a result of 4+.
Additional Scenario Rules:
At 1520hrs, a company of British regulars arrives in the northwest corner of the table. This is the second surprise for the German player. The allied commander on this table can take command of these troops. These troops however are destined for another battle, and are not assigned to this one. If they are used in the attack and lost, then they will not be available for another attack to be launched later today in the operation. If they are used and not lost, they will still be delayed, so the allied commander should keep his eye on the overall operation, complete his mission if he can, but not make things harder for his fellows elsewhere. Tough decision. The speed at which they proceed to the battle for which they are intended is measured from the Game Time that the last of them exits the table's southern edge (anywhere along this edge is fine).
At 1530 hours GT, the German commander receives a message by motorcycle courier. It is from the garrison commander of the town. This is the third surprise for the German player.
“Urgently request situation report. We are now at the time when we have to decide whether to stay or whether to go. The town is becoming near ungovernable. I am having difficulty controlling the populace but it not impossible. Most of my men are now under your command in the field. I will act on your assessment of the situation. I am still being told that reinforcements will arrive within three to four hours. Do we (A) stay as we are, in the reasonable expectation that the front will hold and the allies not reach the city with this attack (two green flares, one white), or (B) send the remaining troops from the city to bolster the defences and let the local population look after itself the while (one red, one blue, one red), or (C) pull out now while it is still possible and withdraw to the east (one white, one green, one white)? Please answer with signal flares, but also make a copy of your decision and return it with this courier. Yours, Major Ekelhaft.”
The German player should make a decision. If he refuses to make a decision, roll 1d6: 1-3 = A, 4 = B, and 5-6= C. Otherwise he should fire off the flares and send the courier away with his answer.
If he picks A, the game continues as before. If he picks B, every initiative thereafter he rolls 1d6 and on 4+ he learns that an SMG platoon, two rifle stands, and two +1 PCs will enter from the eastern edge of the board the following German initiative. If he picks C, he must withdraw as best he can. He is of course always free to withdraw parts of his force at any time. He might, for example, wish to save the 88mm from being overrun.
At 1545 hours the allies receive a radio signal:
“Please report progress. Please assess feasibility of using roads through the town as route of advance. Can the town be taken with little resistance? Report ground conditions for vehicles. Do you advise advance through town or the to the south of it?”
Setup
From the scenario:
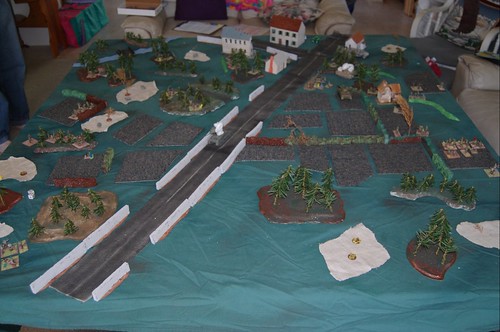
Squarish table. Just off table to the east is a major town/small city. You may like to put some buildings around this edge, perhaps close to a road leading off the edge, representing the thin outskirts of the built-up area. The rest of the table is a scatter of countryside terrain. The allies enter from the west. They must have plenty of cover along this edge so that they do not all get mown down as soon as they step on the table.
The German forces deployed first and were allowed to start anywhere on the table except for within one foot of the western edge of the table. The allied forces would enter from the east.
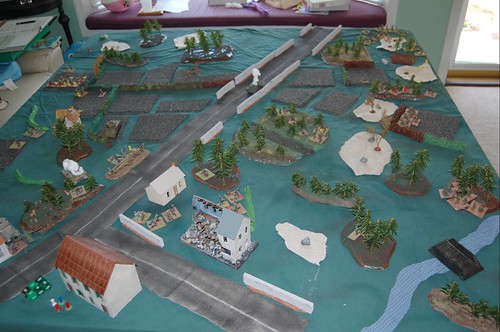
The table was setup up with a mix of forests and fields in the middle. The Germans were protecting the town or city that would have been off to the east, marked by the few buildings that can be seen along the edge of the table.
The Game
14:30 Game Time (GT)
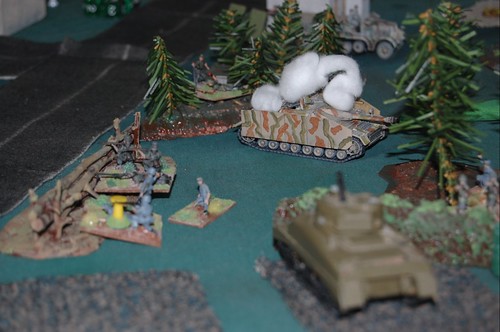
I started out with a tank driving up the road to attack the infantry in the woods. The 88 covering the road fired and suppressed the tank, costing me the initiative. The Panzershreck team in a stand of trees further east finished off the tank with a well placed shot.

14:35 GT
After the Germans repositioned a little, it was my initiative again and I started bringing on the infantry. One Company advance through the woods on the north side of the road (left of the burning Sherman). They started a firefight with the German platoon in the first stand of trees. Despite HMG support, they could not suppress the Germans and the advance ground to a halt.
14:45 GT
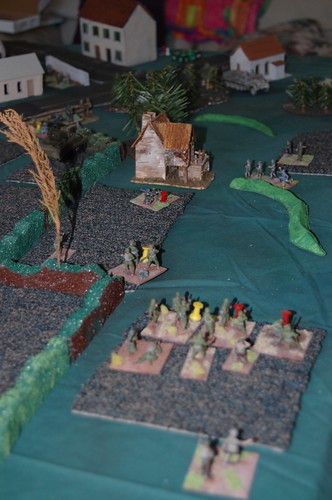
Meanwhile the second company was moving through the fields south of the road and came under fire from Germans in hastily prepared positions along a crest line near a farmhouse. The first platoon ended up getting pinned down in the field, giving the Germans a chance to counter-attack. As the firefight picked up, the second Sherman came up to provide close support and helped beat back the attacking squads. That game the second US platoon an opportunity to move in around the hedges and close assault the German squads. After some fierce fighting and multiple close assaults from both sides, the US platoon was victorious (I think with the loss of only one squad).
The Company Commander and Forward Observer moved up to start calling in artillery on the remaining German platoon and the third US Platoon moved up under the cover of the bombardment. Unfortunately that platoon got caught in the open by a German HMG behind the farmhouse and was wiped out over the course of a couple of initiatives.
14:50 - 15:05 GT
The Sherman moved forward again to try to rescue the pinned US platoon and noticed the Panzershreck team sneaking forward in time to suppress them with machine gun fire. The artillery bombardment continued and it looked like the Germans were starting to falter. The Company Commander called off the artillery and told them to drop some smoke on the north side of the field. Unfortunately in the pause the Germans quickly rallied their troops. Before the US squads could get into cover they were gunned down.
As the smoke barrage finished, the rumble of German armor approaching the farm could be heard. The Lieutenant in the field radioed that a StuG had taken up an ambush position and was waiting for the Sherman to advance into it's sights.
15:10
The Sherman crew decided to go tank hunting and reversed their tank to make a path through the fields and work their way behind the StuG. The first shot missed, but as the StuG pivoted, the Sherman crew hastily reloaded an put the second round through the side armor.
15:20 GT
Angered, the nearby German squads ducked some MG fire and replied with a panzerfaust from behind the hedge. The Sherman brewed up as the crew hastily bailed out.
Soon enough time had passed that a British company appeared on the board. It was only passing through, but stopped long enough to detach a platoon and then continue south again. The 2-inch mortar dropped smoke in the middle of the road so they could cross without coming under fire from the 88mm gun near the town.
As they left, the British platoon tried close assaulting the German platoon in the woods just north of the road. They got pinned before entering the woods, but the Lieutenant rallied the first squad and they pressed on only to be pinned again. They were plucky though and rallied once more, but for nothing since this time some were wounded by the German fire and suppressed just inside the woods. As they sat there, huddled down in whatever cover they could find, nearby German mortars started firing and suppressed the rest of the platoon.
15:30 GT
The fresh troops were enough to convince the Germans commander that the situation was getting out of hand. When a courier from the city arrived to get his assessment of the situation, he decided to fall back and told the courier to relay the message back to his superior.
15:35 GT
Germans had withdrawn most of their troops on the table. The 88mm Flak had been hitched up and the half-track pulled away into the town. The 3rd platoon and attached HMG and FO were left in the woods north of the road to make it out as best they could later on.
Losses
The US lost 5 rifle squads from the 1st company and 1 squad from the second company. Both Shermans were lost as well.
The Germans lost 3 rifle squads and a PC, 1 HMG, and 1 Panzershreck team from the 1st company. The 2nd lost 4 rifle squads and a PC. The StuG was destroyed also.